From Paradise to Sunrise: framing Mount Rainier in one epic weekend
When you first glimpse Mount Rainier, it doesn’t just rise — it commands. Towering 14,410 feet over the evergreen sea of Washington State, this snow-capped giant feels almost mythical, wrapped in mist and crowned with glaciers that catch the sun like shards of glass. It’s the kind of landscape that makes even the most seasoned traveler stop mid-sentence, camera trembling slightly, and whisper, “Wow.”
Mount Rainier National Park isn’t just a mountain — it’s a living masterpiece of ice, fire, and fleeting light. Wildflower meadows explode in color across Paradise Valley, waterfalls tumble down hidden ravines in Longmire, and dawn paints the peak in pink and gold like a divine signature. For photographers, it’s a symphony of contrast — jagged ridgelines and soft alpine haze, thunderous rivers and pin-drop silence. Every moment here feels borrowed from something eternal.
The mountain reveals its best moods from July–September, when trails are clear, skies are crisp, and sunsets burn like embers over the Cascades. Fly into Seattle-Tacoma International Airport (SEA) — just a 2.5-hour drive — and plan two to three days to explore from Sunrise to Paradise (yes, those are their real names). Because at Mount Rainier, nature doesn’t just invite you to look — it dares you to feel small, breathe deep, and remember what awe really means.
📸 The Visual Story: “Why This Niche Captures Hearts”
Mount Rainier isn’t just a mountain—it’s a mood ring for the sky. One hour it’s a shy silhouette behind marine haze; the next, it’s a rose-gold pyramid hovering over lakes that look hand-polished. Add subalpine meadows, rivers braided with glacial silt, and century-old fire lookouts, and you’ve got a canvas that rewards patience and a good pair of legs. Photographers come for the big face of Tahoma—they stay for the micro-textures: lupine halos, heather hummocks, wind-pressed snowfields, and mist snagging on the Tatoosh Range. This is the place where your wide-angle earns its keep and your tripod finally feels essential.
If you’re starting from Seattle and want a no-stress first pass at the mountain’s greatest hits, the small-group Mt. Rainier Day Trip from Seattle is an easy way to scout compositions before you self-drive—think Reflection Lakes in soft morning light and Paradise meadows when the wildflowers pop. Back in the city, cap your shoot day with an Evening Colors Sunset Sail on Elliott Bay; it’s a mellow blue-hour palate cleanser that pairs skyline silhouettes with the kind of pastel tones you’ll be chasing at Tipsoo and Fremont Lookout.
A few links and ads here are affiliate portals. If you click through and snag something, you’ll be fueling my next photo-quest at no extra cost to you. Thanks for keeping the adventure rolling!
🎯 Top 10 Can’t-Miss Subjects in Mount Rainier National Park
Mount Rainier is a shape-shifter—one minute cloaked in coastal haze, the next blazing pink with alpenglow—so our “can’t-miss” shots lean into places where the light, water, and wildflowers do the heavy lifting. You’ll hear the hiss of meltwater, smell crushed heather underfoot, and watch clouds snag on the Tatoosh Range as the mountain plays peekaboo with your composition. These ten subjects balance roadside icons (hello, Reflection Lakes) with earn-your-view ridgelines (looking at you, Fremont Lookout) so you can build a portfolio in a single weekend. Expect mirror-calm lakes at dawn, textured waterfalls at midday, and ridge-line drama at golden hour—each spot chosen for strong foregrounds, clean sightlines, and seasonal payoff.
Reflection Lakes — mirror magic at road’s edge.
A classic for a reason: when the wind naps, Mount Rainier sits perfectly in the water like a painted postcard. Compose low for foreground wildflowers in July–August, or use lingering ice patterns in June for texture. Watch for headlight trails after sunset if you love a glint of motion in your frame.
🕒 Best Time to Shoot: dawn to early golden hour (also blue hour)
💵 Access Cost: included with park entry
💡 Insider Tip: If ripples ruin the mirror, shoot tight reflections with a telephoto slice.Tipsoo Lake — sunrise amphitheater on Chinook Pass.
At Upper Tipsoo, the first light strikes the summit and rolls down like honey. Boardwalks make it easy, but step lightly to protect meadows. In late summer, add paintbrush and lupine to your corners for scale. Autumn brings crisp skies and frost halos.
🕒 Best Time to Shoot: sunrise and blue hour
💵 Access Cost: included with park entry
💡 Insider Tip: After the wide shot, climb the knoll above Upper Tipsoo for cleaner sightlines. Michael Russell Photography+1Skyline Trail to Panorama Point — the mountain at full volume.
From Paradise, this loop dishes out glaciers, crevasses, and cloud rivers. Snow lingers—pack traction in shoulder seasons. Frame hikers as scale figures on the switchbacks or go low to exaggerate heather and stone textures.
🕒 Best Time to Shoot: late afternoon into golden hour
💵 Access Cost: included with park entry
💡 Insider Tip: A short detour toward Pebble Creek yields fewer crowds and grander ice.Myrtle Falls — postcard cascade with Tatoosh drama.
A short walk from Paradise puts you at a perfect bridge vantage. Compose verticals to include wildflower skirts; try a 1/4–1 sec exposure for silky water and keep the mountain in the pocket of the frame.
🕒 Best Time to Shoot: early morning or overcast
💵 Access Cost: included with park entry
💡 Insider Tip: Bring a small cloth—spray drifts onto lenses in summer.Mount Fremont Lookout — sunset from a century-old eyrie.
The Sunrise area’s star trail: an airy ridge walk to a historic fire lookout with the mountain close enough to feel its breath. Sunset paints alpenglow across the Winthrop Glacier and far ridges.
🕒 Best Time to Shoot: golden hour to blue hour
💵 Access Cost: included with park entry
💡 Insider Tip: Pack a headlamp and layers—the wind bites after dusk. Women’s Tennis Association+1Tolmie Peak Lookout & Eunice Lake — emerald bowl reflections.
A jewel-tone alpine lake mirrors Rainier with a lookout perched above. The switchback finale delivers layered compositions: water, trees, summit—boom, depth.
🕒 Best Time to Shoot: late afternoon through sunset
💵 Access Cost: included with park entry
💡 Insider Tip: If wind picks up, hike higher—shoot the lookout against a cloud-stacked sky.
Narada Falls — basalt, mist, and rainbows.
The spray throws prismatic arcs on sunny days. Use a circular polarizer to tame glare; go wide to include the mossy gorge, or isolate veils at 70–100mm.
🕒 Best Time to Shoot: mid-morning for rainbows; overcast for texture
💵 Access Cost: included with park entry
💡 Insider Tip: Microfiber towel + lens hood = fewer water spots between takes.Grove of the Patriarchs (when open) — cathedral of giants.
Ancient cedars and firs muffle sound like a natural studio. Perfect for verticals with a person for scale.
🕒 Best Time to Shoot: anytime with soft light
💵 Access Cost: included with park entry
💡 Insider Tip: Bring a 15–35mm; keep tripods tight on the boardwalk.Christine & Comet Falls — silver ribbons with thunder.
Steeper trails, bigger payoff. Long exposures reveal lace; fast shutters freeze the muscle.
🕒 Best Time to Shoot: overcast or late afternoon
💵 Access Cost: included with park entry
💡 Insider Tip: Watch your histogram—bright froth clips fast.Sunrise Point pullouts — car-to-camera panoramas.
A road tripper’s dream: immediate layers of Rainier, Yakima Peak, and endless ridgework. Stitch panoramas or stack telephoto frames for compression.
🕒 Best Time to Shoot: sunrise and the first clean light
💵 Access Cost: included with park entry
💡 Insider Tip: Park safely; winds can door-slam on the ridge.
🔍 Hidden Gems & Photographer Favorites
Not every frame of Mount Rainier needs a crowd at your back or a boardwalk underfoot. Tuck into the fringes and you’ll find meadow knolls, wind-scoured ridges, and moody pullouts where the mountain plays peekaboo between cloud seams. These quieter corners reward patience—the kind where you wait for a breeze to pause, or for fog to lift just enough to etch Tahoma into the sky. They’re perfect for adding texture to a portfolio heavy on postcards: tighter sightlines, unexpected foregrounds, and light that feels like it belongs only to you.
Mazama Ridge wildflower knolls — rolling meadows with braided meltwater and painterly layers.
Insider Tip: Stay strictly on established paths; use a wide angle at knee height to keep the subalpine pristine while filling the frame.Ricksecker Point — fast-changing cloud theater above the Nisqually valley with easy pullouts.
Insider Tip: Storm days sing here—bring a cloth for lens mist and shoot short bursts between gusts.Van Trump Park — intimate summit views and thinner crowds once you crest the meadows.
Insider Tip: Late summer shines; in early season, microspikes help on lingering snow.Sunrise Rim — wind-carved pumice, glacial vistas, and long lines for silhouettes.
Insider Tip: Pack a wind shell and stabilize your tripod—gusts make accidental motion blur a feature, not a bug.
💵 Sleep • Eat • Move: Cost Snapshot
Mount Rainier skews affordable if you balance park-adjacent motels in Ashford/Enumclaw, picnic lunches, and self-guided hikes. Expect $150–300 nights for mid-range stays in high season, $15–25 per meal when dining in gateway towns, and modest transport costs if you self-drive. Park entry is $30/vehicle for seven days; occasional timed-entry windows at peak corridors can affect when you drive in—plan dawn/dusk arrivals to dodge crowds and score better light.
| Category | Range (USD) | Example/Value |
| Lodging | $90–150 (budget) | Motels/cabins in Ashford or Enumclaw; basic, clean, close to trailheads. |
| $150–300 (mid-range) | In-park inns or well-rated lodges; better views and dining access. | |
| $300–600+ (luxury) | Resort stays near Crystal Mountain; spa vibes, premium outlooks. | |
| Meals | $10–18 (budget) | Picnic supplies, delis; coffee + sandwiches for sunrise missions. |
| $18–35 (mid-range) | Gateway restaurants; burgers, Himalayan plates, house pies. | |
| $35–60 (luxury) | Summit dining or lodge restaurants; sunset dinners with views. | |
| Transport | $10–25 (budget) | Gas share per day if splitting and staying nearby. |
| $25–50 (mid-range) | Full-day self-drive with multiple trailhead hops. | |
| $50–120 (luxury) | Gondola/tours layered onto driving days. | |
| Activities | $0–30 (budget) | Trails, overlooks; entry included in park fee. |
| $30–100 (mid-range) | Guided walks, rentals; learning-focused time. | |
| $100–250+ (luxury) | Private guiding or lift+dine combos for tailored views. |
Average Cost Per Day in Mount Rainier National Park
Daily budgets hinge on lodging distance from Paradise/Sunrise, whether you picnic or dine out, and if you add lifts or guides. Budget travelers who camp or choose simple motels and self-cater can keep costs lean. Mid-range adds comfortable stays and sit-down meals without breaking the bank. Luxury layers scenic dining, private guiding, and premium rooms with mountain views.
| 🧳 Traveler Type | 💵 Daily Estimate (USD) | 📌 What’s Included |
| 🎒 Budget – Wander Smart | $85–140 | Budget room/campsite, groceries, gas share, coffee, park entry. |
| 🏖️ Mid-Range – Wander Well | $180–280 | Lodge/mid-hotel, two meals out, snacks, gas, optional rental. |
| 🏰 Luxury – Wander Luxe | $350–650+ | Premium lodge, scenic dining, guide/lift, flexible transport. |
📸 Essential Photo Tips for Capturing Mount Rainier
Glacier Light, Alpine Meadows, and Clouds That Tell a Different Story Every Hour
Mount Rainier is a photographer’s playground carved from ice and sky—wildflower meadows, mirror lakes, and ridgelines wrapped in weather. Smart packing keeps you ready for golden light at Reflection Lake, fog-drift on Paradise Meadow, and twilight glow from Sunrise Point without freezing or frying. Bring water, a wide-brim hat in summer (swap for a beanie in fall), and layered, breathable gear—temperatures swing fast with elevation. Slip light socks for lodge visits, and wear grippy, waterproof shoes for slick boardwalks and snow patches. A soft lens cloth is your best friend—mountain mist and pollen love your glass—and practice low-key stabilization (rocks, trekking poles, elbows) where wind or terrain challenge full tripods.
👉 The Nomad’s Kit: Gear That Earns Its Miles
Canon RF 15–35mm f/2.8L — Ultra-wide for glacier basins, meadow wildflowers, and the full mountain mirrored in Reflection Lake when stepping back means “hello, slope.”
Canon RF 24–105mm f/2.8L — Your trail-to-vista workhorse: mid-tele textures of lupine and snowmelt, hikers on Skyline Trail switchbacks, and quick lodge vignettes—no lens shuffle in alpine wind.
Canon RF 100–500mm f/4.5–7.1L IS USM — From Sunrise Ridge or Tipsoo Lake, compress glacier folds and layered peaks; isolate marmots, lenticular clouds, or far-off climbers on the Emmons Glacier.
Lowepro ProTactic BP 350 AW III — Trail-tough and weather-ready; keeps filters dust-free and balanced when scrambling over pumice or snow.
Peak Design Travel Tripod — Perfect for blue-hour panoramas and milky waterfall shots; hang a weight—Rainier gusts are notorious.
JOBY GorillaPod 3K Kit — Clamp to railings or rock ledges at overlooks for silky water and cloud-drag timelapses—tiny footprint, rock-steady horizons.
Cut Glare. Shape Time. Make Every Frame Sing.
Rainier is reflection heaven—snowfields, ice, and wet meadows gleam under fierce light. A circular polarizer tames glare on snow and glassy lakes, pulling out true color from glacier blues and alpine greens; a variable ND lets you slow the world, turning cascades to silk, hikers to whispers, and clouds into sweeping motion trails across the summit.
🌊 Control Reflections & Punch Up Color
Circular Polarizer Filter — Reduce hotspots on snowfields and lake water, reveal underwater stones, and deepen sky saturation above the volcano. Pro tip: rotate gently—over-polarizing can band high mountain skies; aim for balance between drama and realism.
⏱️ Drag the Shutter in Broad Daylight
Neutral Density Variable Filter — Drop 3–6 stops to blur the cascades at Narada Falls, smooth ripples on Reflection Lake, and paint moving clouds over Paradise Meadows. Pro tip: start around 1/4–1 s for subtle motion; go 2–10 s for dreamy water and drifting fog.
Pack both for any trip: the polarizer reveals the scene; the ND sculpts time. Together, they’re a portable “wow” switch.
Photo Policy Reminders — No flash in visitor centers or ranger exhibits; tripods/stands are welcome outdoors but keep clear of trails and fragile meadows. Drones are prohibited anywhere in the National Park. Stay on marked paths (the tundra scars easily), secure gear against gusts, and carry extra batteries—the mountain eats both charge and light faster than you think.
| ⏰ When to Shoot | 📍 Where & What to Shoot | 📷 How to Nail the Shot | 🏛 Tourist Traffic | 💡 Insider Tip |
| Sunrise | Tipsoo Lake reflections of Mount Rainier | Arrive pre-dawn; go low for mirror glass. Bracket exposures for bright snowcap. | Moderate–High (peak season) | Climb the small knoll for cleaner sightlines and fewer footprints. |
| Early Morning | Reflection Lakes classic postcard angle | Use a 2–3 stop ND if breeze picks up; frame wildflowers in corners for scale. | High | Shoot tight reflection slices with a longer focal length if ripples appear. |
| Midday (Overcast) | Narada Falls and stream textures | Polarizer to kill glare; 1/5–1 sec shutter for silk. Keep lens cloth handy. | Moderate | Try verticals to emphasize basalt walls and falling lines. |
| Golden Hour | Skyline Trail meadows toward Panorama Point | Backlight flowers for glow; shoot at f/8–f/11 and let the path lead the eye. | High | Walk 5–10 minutes off the main viewpoints (on-trail) for solitude. |
| Blue Hour → Night | Fremont Lookout alpenglow and star silhouettes | Lock tripod; ISO 1600–3200 for star silhouettes; keep people as scale on ridge. | Moderate | Pack a headlamp and puffy—winds are sharp after sunset. |
🌎 Cultural & Historical Context
Mount Rainier is Tahoma—a sacred, storied summit to Coast Salish peoples—revered long before it became a national park. Early climbers turned the volcano into a proving ground, while the fire lookouts stitched across these ridges speak to a century of stewardship. The Paradise Inn and historic trails are love letters in cedar and stone, built to frame the mountain without upstaging it. Today, crowds come for flowers and glaciers, but the deeper thread is time—ice carving, forests renewing, people learning to tread lighter.
🧣 Language & Local Lingo You’ll Hear — Terminology Cheat Sheet for Mount Rainier National Park
Knowing the lingo around Mount Rainier National Park isn’t about sounding clever—it’s about moving smarter and earning better cooperation in the field. A few well-placed terms help you chat with rangers, read trail updates, and quickly coordinate with other photographers when the light flips from gray to alpenglow. It also smooths traveler moments—asking for directions, timing, or a quick “mind if I step in for one frame?” without killing the vibe. Learn these essentials and you’ll glide through boardwalk etiquette, Leave No Trace reminders, and timed-entry quirks like a local, all while lining up cleaner compositions and friendlier smiles.
| 🔧 Term | 📝 Meaning | 🎬 Example Usage |
| Alpenglow | Warm summit light at dawn/dusk | “Wait for alpenglow before leaving Fremont Lookout.” |
| Blue Hour | Cool twilight color after sunset/before sunrise | “Blue hour at Tipsoo is mirror-smooth.” |
| Bracketing | Multiple exposures for dynamic range | “Bracket at Reflection Lakes to protect the snowcap.” |
| Cathedral Forest | Old-growth with towering trunks | “Patriarchs feels like a cathedral forest.” |
| Compression | Telephoto effect stacking distant layers | “Use 105mm for ridge compression at Sunrise Point.” |
| Glissade | Controlled slide on snow (not for beginners) | “No glissading here—snow is too icy today.” |
| Headlamp Etiquette | Shield beam; avoid others’ frames | “Red light on at the lookout after sunset.” |
| LNT | Leave No Trace principles | “Stay on boardwalks—LNT keeps meadows alive.” |
| ND Filter | Neutral density filter for slow shutters | “Slap on ND for silky Narada water.” |
| Pumice | Porous volcanic rock on ridges | “Tripod feet grip better on pumice than hardpack.” |
| Rime | Wind-frozen frost feathers | “Rime on snags adds texture at Sunrise.” |
| Subalpine | High-elevation meadows/krummholz zone | “Subalpine blooms peak mid-summer near Paradise.” |
| Timed-Entry | Reservation window at peak corridors | “Aim after 5 p.m. if Sunrise requires timed-entry.” |
| Wind Scour | Snow stripped by wind | “Expect wind scour on exposed Sunrise ridges.” |
| Winthrop Glacier | Major glacier on Rainier’s NE flank | “Catch crevasse shadows from Fremont at sunset.” |
🍽 Where to Refuel Nearby
Wild places reward full bellies. Around Ashford, Sunrise/Crystal, and Paradise you’ll find hearty, trail-friendly fare and a few view-rich splurges.
Copper Creek Restaurant (Ashford) ($$) — House-made comfort plates and the famous blackberry pie; open year-round with posted hours.
Wildberry Restaurant (Ashford) ($$) — Burgers and Himalayan-Nepalese specials; note seasonal closure timings.
Summit House (Crystal Mountain) ($$$) — Washington’s highest-elevation restaurant via gondola; sunset dinners with a front-row Rainier.
Paradise Inn Dining (in-park, seasonal) ($$–$$$) — Historic lodge dining with limited seasonal hours—check dates before you go.
Regional Roundup ($–$$$) — Towns like Packwood, Enumclaw, and Eatonville add burger joints, cider houses, and pubs if you’re circling the mountain.
🗺️ Quick Itinerary for Capturing the Niche
Pace your day like the light: quiet glass at dawn, texture by midday, ridgeline glow at night.
Here’s a one-day flow that respects both the light and your legs. Start at Tipsoo Lake for sunrise serenity, sweep west for classic Reflection Lakes frames, then climb gently into the Skyline Trail meadows as the crowds thin. Midday, chase water and texture at Narada Falls, break for fuel in Ashford, and then drive the long arc to Sunrise for a fire-lookout finale. If summer timed-entry is in effect for the Sunrise/White River entrance on peak days, aim for an early or late window; the best photos come then anyway.
🕒 5:10 AM — Tipsoo Lake Sunrise Reflections
Arrive in nautical blue hour to claim a quiet shoreline and pre-visualize your foreground. As the first pink hits the summit, work low angles and bracket a clean, mirror-calm exposure. A short climb above Upper Tipsoo buys a crowd-free angle and tidy horizon lines.
🕒 Open: always open; mountain passes subject to weather
💵 Cost: included with park entry
💡 Insider Tip: Keep a spare pair of socks—dew-wet grasses are ruthless.
🕒 7:30 AM — Reflection Lakes Classics
Slide west toward Paradise and pull into the lake turnout while light stays soft. Compose a wide master and then step to a longer focal length for ripple-free reflection slices. If wind rises, pivot to flower-framed shoreline details or use rocks as anchors.
🕒 Open: always open; winter snow closes the road seasonally
💵 Cost: included with park entry
💡 Insider Tip: A 2–3 stop ND helps tame micro-ripples at longer shutters.
🕒 10:15 AM — Narada Falls Texture Study
Park, hike down, and use overcast or shade to your advantage. Polarize reflections, slow your shutter, and wipe between bursts. Vertical frames emphasize height; horizontal captures the gorge’s grip on the water.
🕒 Open: trail typically accessible in summer; use caution on wet steps
💵 Cost: included with park entry
💡 Insider Tip: Bring a lens cloth in a pocket you can reach one-handed.
🕒 12:30 PM — Lunch & Transit (Ashford)
Refuel on comfort food or Himalayan plates; sip something cold and re-pack. This is your data-dump hour: back up cards, recharge batteries, check clouds moving over Tahoma before committing to the east side.
🕒 Open: restaurant hours vary; Wildberry is seasonal
💵 Cost: $15–35 per person
💡 Insider Tip: Grab pastry or pie to go for sunset morale.
🕒 3:30 PM — Sunrise Area Scouting
Roll to Sunrise and survey haze, clouds, and wind. Short test frames from pullouts set your exposure game plan. If timed-entry is active, arriving after 5 p.m. can skip the window and set you up for golden hour calm.
🕒 Open: seasonal road; check status
💵 Cost: included with park entry
💡 Insider Tip: Pack an extra layer—the wind up here tells its own story.
🕒 6:15 PM — Fremont Lookout Sunset
Hike the airy ridge to the lookout and let alpenglow flood the Winthrop Glacier. Lock the tripod, shoot silhouettes of hikers on the skyline, and linger into blue hour for the quietest frames of the day.
🕒 Open: trail typically snow-free mid-summer–early fall
💵 Cost: included with park entry
💡 Insider Tip: Headlamp, gloves, and a thermos turn the walk out into a victory lap.
Hop from alpine glow to harbor glitter—Seattle is the natural twin bill to your Mount Rainier adventure. Sip a serious espresso near Pike Place Market, ferry out for skyline frames, then chase neon and noodles in Capitol Hill. Museums, music, and markets keep rainy days fun, while clear evenings deliver blue-hour reflections along the waterfront. Use our city playbook to stitch coffee, culture, and camera-time into one easy urban loop.
View Our Seattle Guide
🎥 Reels on the Road
This mountain loves motion—mist, water, clouds, hikers moving like punctuation marks across ridgelines. Keep clips short, vary perspective (low meadow crawl vs. high lookout drift), and let sound do some lifting: wind through snags, water roar, boot crunch on pumice. Mix timelapses (cloud rivers over Tahoma) with handheld walk-throughs (boardwalks at Paradise or Tipsoo). If the weather flips—and it will—embrace it; fog and rime are your mood engines.
🎥 Tipsoo Lake — sunrise pan from frost-kissed grass to glowing summit (sunrise).
🎥 Reflection Lakes — slow push-in on mirror glass with wildflower frame (early morning).
🎥 Narada Falls — 1/4-sec motion blur timelapse with polarizer (midday/overcast).
🎥 Skyline Trail — POV hike clip cresting into Panorama Point (golden hour).
🎥 Fremont Lookout — tripod silhouette as alpenglow fades to blue (sunset → night).
This one-minute clip from Mount Rainier National Park captures the raw serenity and untamed beauty of the Pacific Northwest in motion. It opens with two mountain goats grazing along a snow-covered slope, their white coats glistening under a warm summer sun as alpine flowers peek through the thawing tundra. The camera pans to a rushing waterfall, its icy current tumbling through moss-covered rocks framed by evergreen trees — the sound a rhythmic heartbeat of the wilderness. Next, the mood softens inside the historic Paradise Inn Lodge, where timber beams and lanterns painted with wildflower motifs glow with rustic charm, evoking a sense of timeless refuge amid the mountains. The final sequence transitions back outdoors with a sweeping pan across Rainier’s towering peaks, sunlight catching on its glaciers before focusing on a curious chipmunk nibbling a nut, framed against the grandeur of the Cascade Range. It’s a compact, cinematic glimpse into the soul of the mountain — quiet, alive, and endlessly captivating.
🧭 Wrap-Up: Why This Niche Matters
Chasing Mount Rainier teaches patience—waiting for glass-still water, for a cloud seam to part, for alpenglow to finally catch. It’s also a masterclass in restraint: staying on trail, giving meadows space, letting history’s lookouts do the framing while we practice humility. You’ll leave with memory cards full of grand vistas and tiny details—lichen lace, pumice dust, petals backlit like lanterns. Most of all, you’ll carry that feeling of standing under a living volcano while the sky changes its mind every five minutes. That’s travel, that’s photography, and that’s Tahoma—always a little bigger than your lens.
Practical Notes You’ll Thank Me For
Park Entry: $30 per vehicle (7 days). America the Beautiful Pass is accepted.
Timed-Entry Watch: Starting in 2025, the park scaled back to peak-time reservations primarily affecting the Sunrise/White River entrance on select dates—early/late arrivals often exempt. Always confirm before you roll.
Seasonality: Roads and facilities are highly seasonal; confirm Paradise Inn and Sunrise status before you bet a sunset on it.
Food Reality: In-park dining is limited/seasonal; gateway towns are your culinary safety net.
🎞️ Frames From the Road: Scenes Worth Stopping For

Behind the Lens
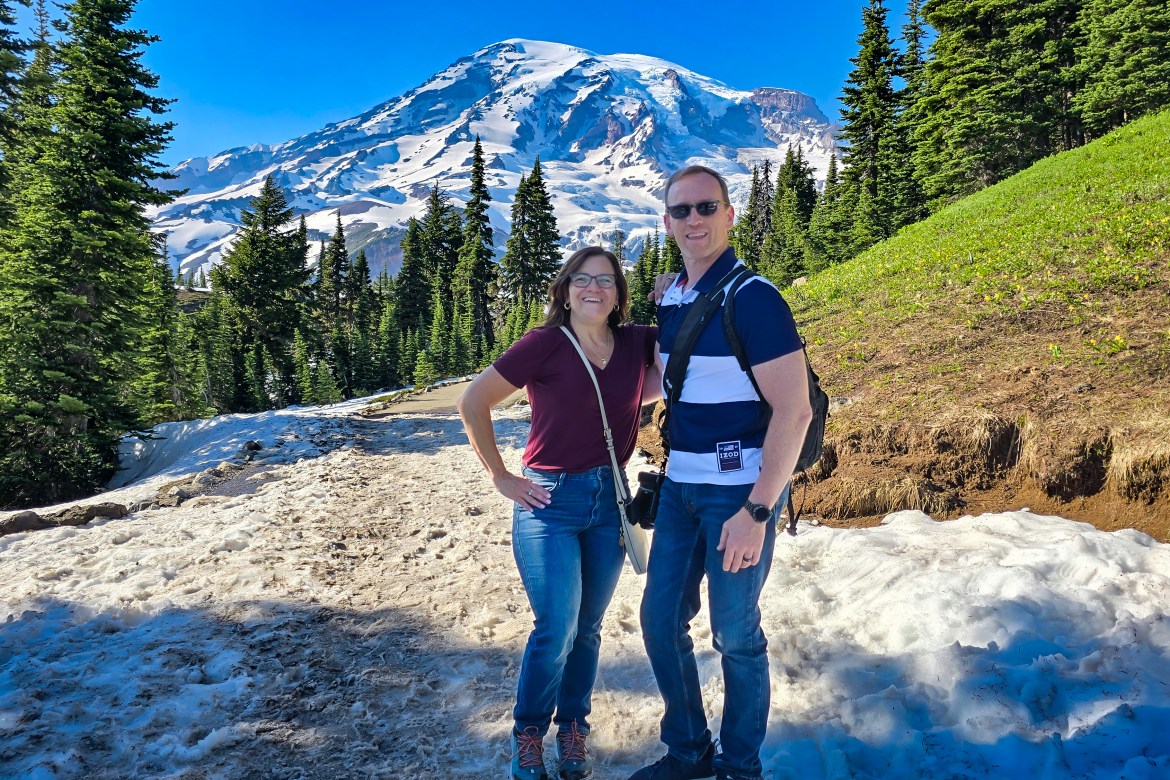
I’m Steve—a retired Army vet who traded ruck sacks for camera bags and now chases light across every latitude I can reach. From 110 point & shoot film camera beginnings to a Canon R5 Mark II and Mavic Pro II drone, I’ve logged shots in 36 countries and all 50 states, squeezing solo photo runs between corporate flights and longer adventures with my wife. Shutter Nomadica is where I share the hits, misses, and field notes so fellow roamers can skip the guesswork and grab the shot!